


Close-up of the ribbing:


First, excellent resources with tips about sewing ribbing:
-- The Sewing Divas tell how to sew your own ribbing.
-- Connie Long's "Sewing With Knits" book has a section with tips
-- Threads magazine Twin-Needle Reference Chart showing how to get various effects
You will be sewing with a twin needle, so your machine will need ability to do zigzag stitching. Here are resources for twin needle sewing:
-- The basics of twin needles from Sewing and Craft Alliance (PDF doc)
-- Twin-needle stitching article at BurdaStyle
Have extra twin needles on hand. I did not have extras while working on a large project requiring hours of twin needle stitching. I was using a stretch twin needle, 4.0 millimeter width, and it broke. I had only smaller millimeter stretch twin needles on hand. So, an emergency trip to JoAnn ensued, but they did not have stretch 4.0 twin needles in stock. So I got a universal 4.0 twin needle so the ribbing would be the same width. Unfortunately the twin needle kept skipping stitches on the old cotton jersey T-shirts I was sewing. Lots of skipped stitches. Really bad. UGH! So I rooted through my notions and found a denim 4.0 twin needle. Thankfully it worked fine on the cotton jersey.
Sewing ribbing consumes a great deal of thread. Just like starting a business, where they tell you however long you think it will take and however much you think it will cost, double the estimates ... I learned that doubling the thread you think you will need will help you avoid unnecessary trips. Unless your thread source is close by. You'll see a spool of woolly nylon here. I use woolly nylon in the bobbin to add stretch to the ribbing.

Get good thread such as Gutermann or Metrosene. For a big ribbing project where I needed black thread, I was thrilled to think I could use up a bunch of $1 sale Coats thread that I'd had on hand for many years. Use it and get rid of it! Cheap! Joy! Well, well, well ... the threads kept twisting and knotting together before going through the twin needle, and I could see a great deal of thread dust and fraying happening. This caused the threads to break frequently, bringing frequent interruption in the middle of a nice line of ribbing, causing me to have to rip out lines of stitching and rethread the needles. Then it would happen again. By the fourth nasty entanglement, with very little productive sewing time between entanglements, I gave up on the $1 spools and loaded the machine with a Gutermann and a Metrosene from my thread rack. The thread flowed like a smooth river through the needles and through the fabric, and sewing line after line of ribbing was a serene exercise after that thread change. Not a single tangle. Very zen.
This experience reminded me of a post on Stitcher's Guild years ago where someone showed extreme close-ups of various threads. The picture showed all the frayed pieces on Coats threads, versus the smooth finish of other threads. At the time, I honestly was skeptical that thread could make such a difference. But I could see this happening with my project, it's like the fraying of the Coats threads were getting hung up and stuck on each other. So save yourself the grief and the time, and from the beginning choose your thread carefully.
The reverse side of ribbing looks interesting too. Here are both sides of old t-shirt fabric with ribbing samples. Depending on the look you're going for, either side could be used.
"Right" side:

"Wrong" side:


Although, you may not get massive ribbing like this -- there is cording underneath the ribs to make the corrugated effect more obvious.
Ribbing & pintucks create cool design elements and shaping. Here's ribbing used in a very different way on sleeves, from the same BurdaStyle article as the corrugated coffee sleeve above:

Ribbing isn't just for hems. As the above photo shows, you can be creative and use ribbing as a decorative and shaping element in many areas of a garment. Pintucking can produce a similar effect when there are lots of pintucks. The photos below shows an idea to shape the waist area, from a BurdaStyle article about restyling t-shirts with pintucks:

You can strategically use ribbing to make a garment fit closer and more shapely, as Connie Long explains in her book Sewing With Knits. Use ribbing to make a knit top fit closer over the bust and release fabric to fit looser over the hips as shown here:


Here's a little burst of ribbing for shaping on a knit top at eShakti:

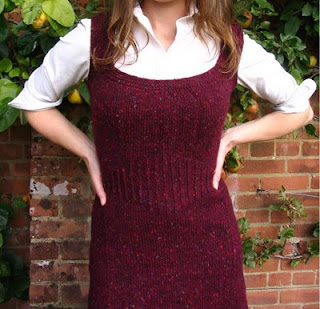
Here's waist shaping from a knitting pattern, but the concept could be applied to a sewn knit garment:
The above photos look like knits. Here's a similar effect with pintucks on a woven, on an Eileen Fisher silk tank from Garnet Hill:


You could choose thread colors that contrast with the fabric color to make ribbing even more of a design element, on right or wrong side of fabric. If you don't want thread to show so obviously, just choose thread in a close color and it may disappear into thicker knit fabric but will likely be visible when viewed closely on thinner knits.
If you're not sure about shaping a garment for the human body, try ribbing fabric for a pillow or other home accessory. Or, a scarf.

Most of all, have fun! It does take patience to sew many lines of ribbing, but I find it very meditative. Surprising, as I'm not the most patient person on the planet.
EDITED TO ADD: If you don't want to sew, here's a beautiful silk ribbed fabric at EmmaOneSock:

It would make something similar to the Eileen Fisher tank shown above.
No comments:
Post a Comment